Pin a Day: Chicken Bacon Ranch Slow Cooker Meal

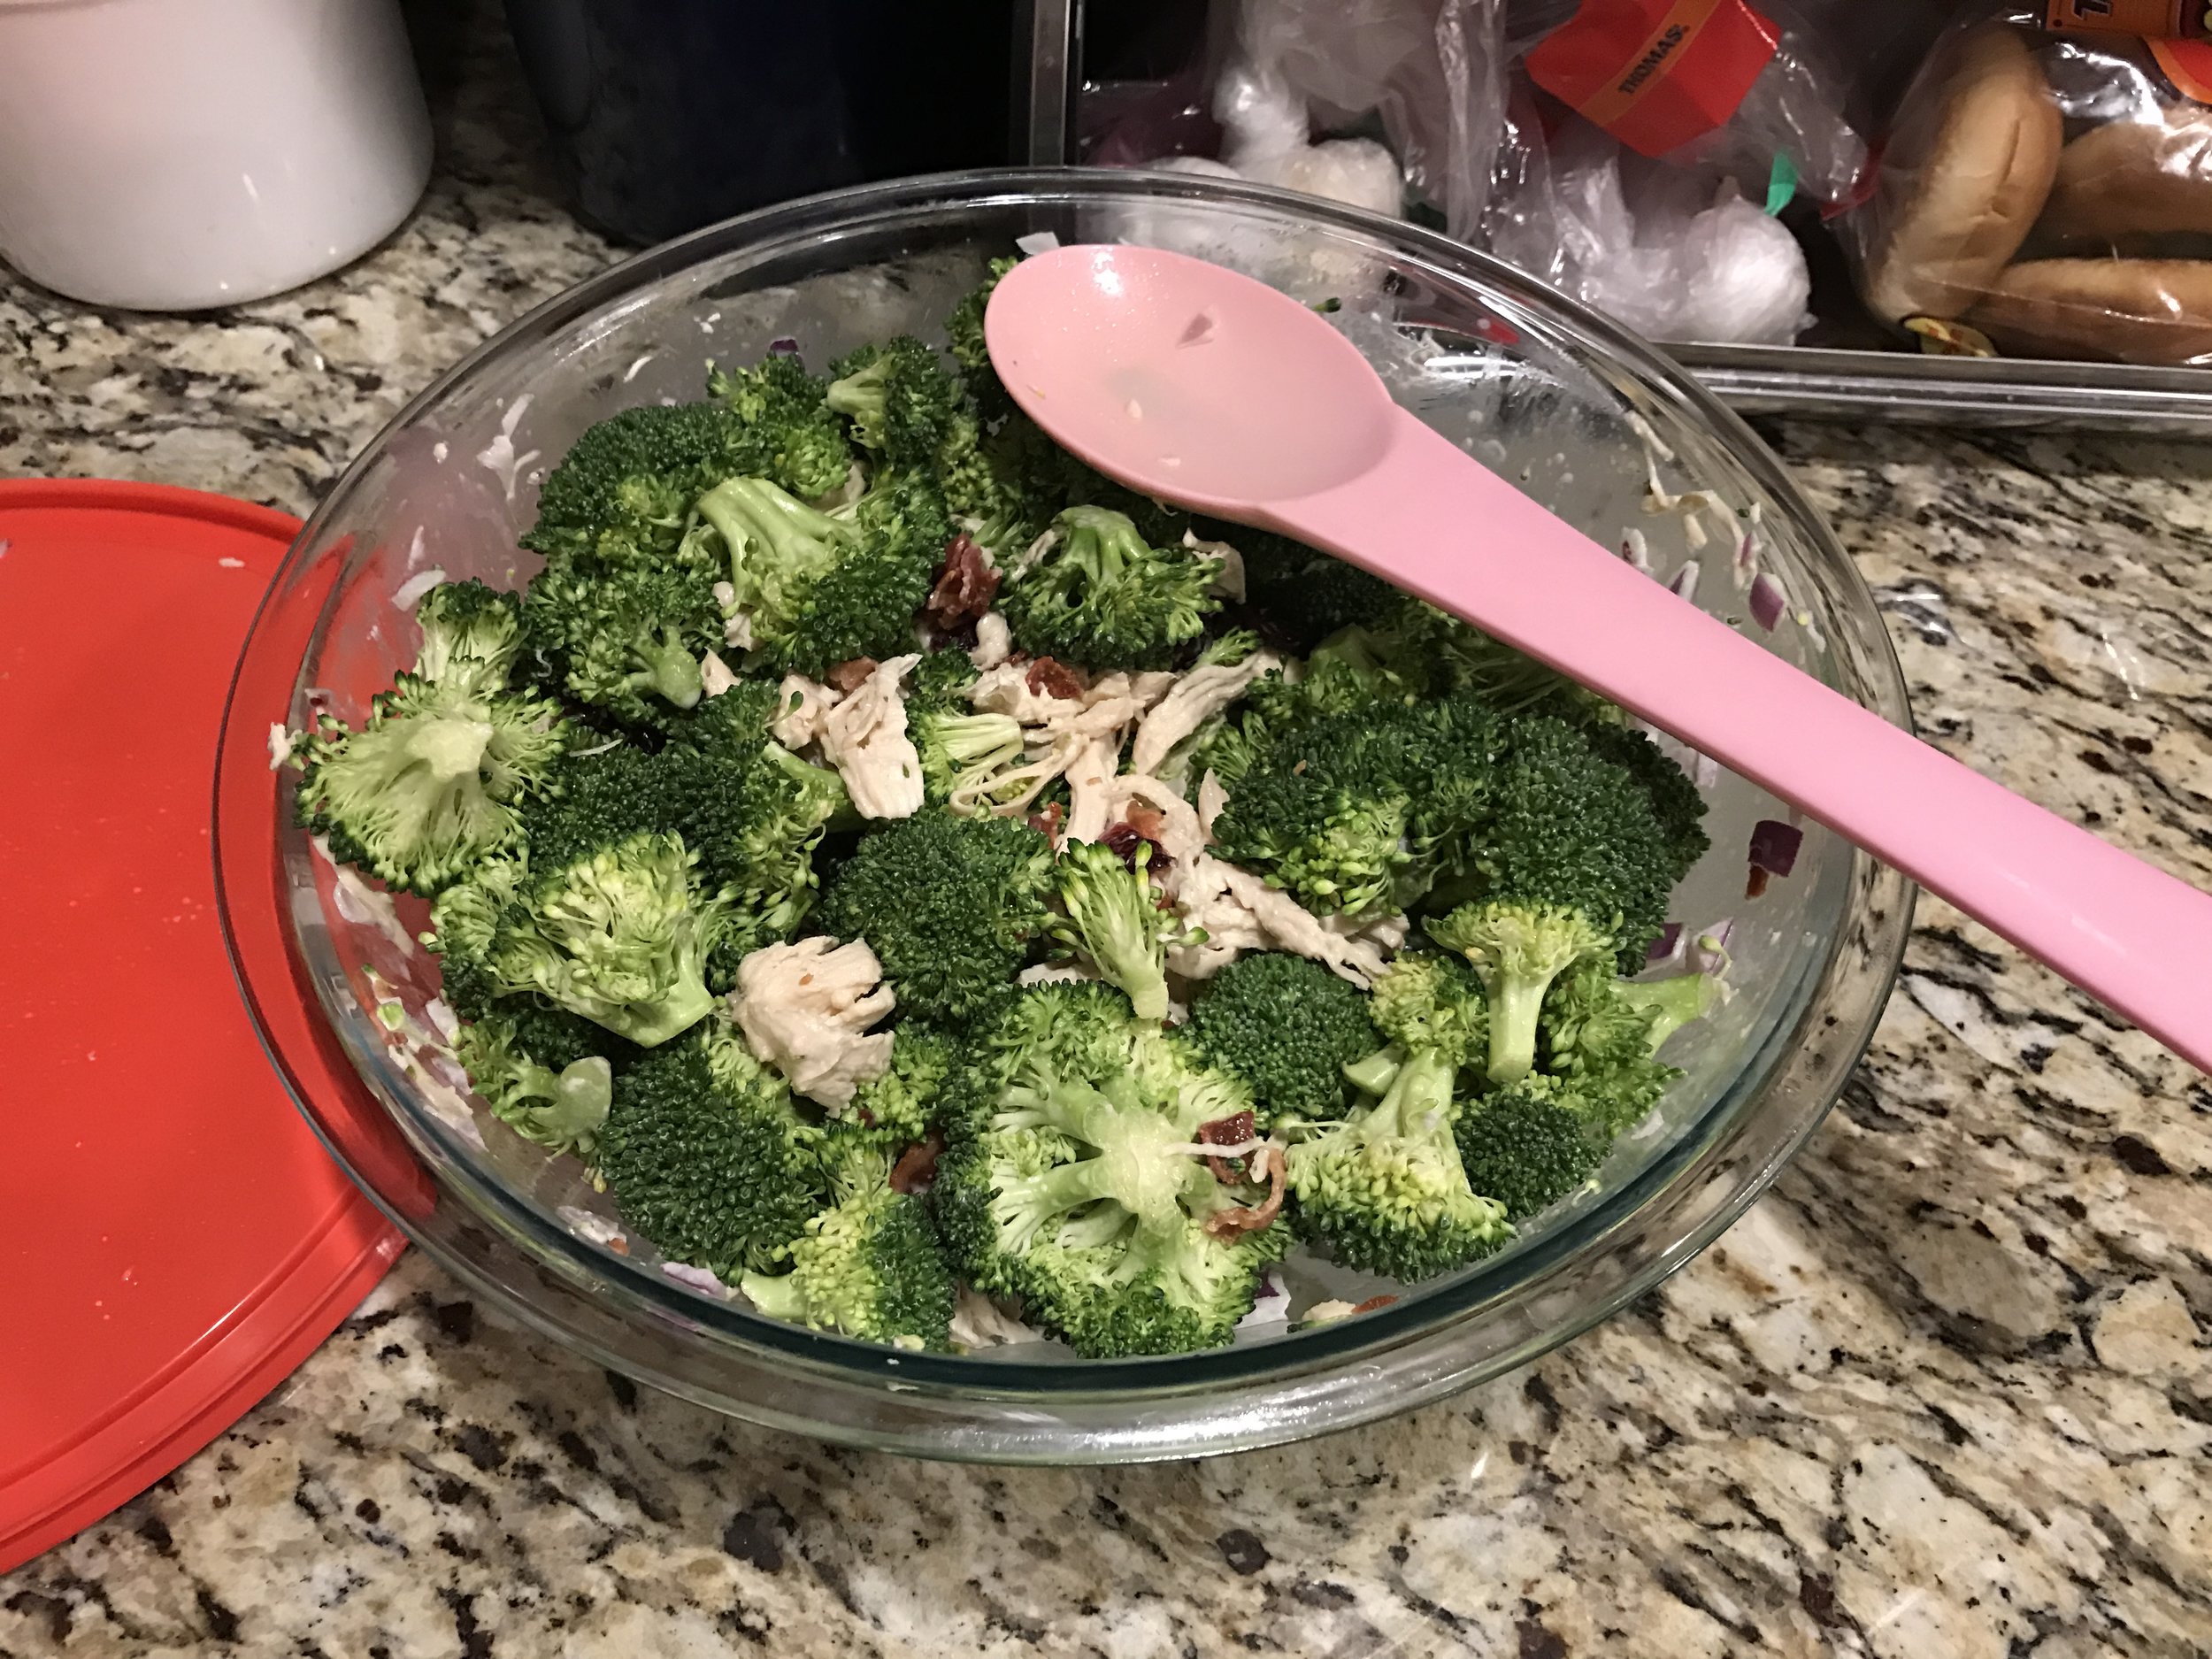
This Saturday we had a lazy day.    Neither of us was feeling 100% and the weather was a little cool and cloudy.  Fortunately, I had over planned food for the week, and had the ingredients to try a new meal.  So, we tried Chicken Bacon Ranch Slow Cooker Meal.    This meal sounded easy and was full of ingredients that we love.  I started by putting a chopped onion in the slow cooker.  On top of that I added my chicken breasts.  Next, I added chopped up bacon, garlic, 2 cans of cream of chicken soup, and a packet of ranch dip.  I stirred everything until it was well combined.  I put my lid on the slow cooker and set my timer for 4 hours on high temperature.  I normally prefer to cook on low, but I got a late start on the meal.  With a half hour left, I started some water to boil and make some rice.  I pulled the chicken out of the crockpot and shredded it using my beast claws.  I put the chicken and sour cream back into the slow cooker and stirred well.  I allowed the chicken to cook on low while I was cooking the rice.  

CC5740E5-59F7-44D7-AF5B-3D8F6DC73BD6.JPG

The results were fabulous!  We had a warm, creamy chicken dish that tasted great on top of rice.  This is a great cooler weather meal and would taste great with broccoli or green beans as a side dish.  It made a great leftover and would be tasty as a wrap, too. 

Wacky Waco Adventures

On Tuesday, I met one of my dearest friends, Ashley, and her sweet boy, sister, mom, and aunt for a day of fun in Waco.  We all got to a late start, but made it to Magnolia around 11-1130 to start our adventure.  We spent some time in the store and on the grounds before heading to the Findery for a bit more shopping.  By the time we were done at the Findery, it was time to eat.  Ashley remembered that we wanted to try Schmaltz's last time we were in Waco, so we headed there. 

994101CE-E6AD-47C1-B1A0-9DC076AE89B6.JPG

It looked like a hole in the wall, but inside was something special.  Everyone was super friendly and helpful as we made our selections.  I opted for a turkey sandwich (not really a surprise). With bacon, lettuce, tomato, onion, cheese, and mustard on wheat.  They also put a garlic butter spread on before they heated it up.  Our sandwiches were fabulous!  They were warm and gooey.  Everything was awesome and we were refueled for more adventures.. 

495F3AA2-A252-42EC-B9B6-2A2B5EEF6BA3.JPG

We went to a couple more antique/furniture/junk shops, but found many of them were closed.  Apparently, many of them are only open Thursday-Sunday, when most of the tourists are visiting.  We also found that most things seemed to close between 3-6 pm, so we had to plan accordingly.  We spent some time at Spice Village, picking up some neat things for our homes.  We headed back to Magnolia to visit the bakery and store one last time.  I sampled a chocolate and coffee cupcake that was quite delightful and grabbed a couple of chocolate chip cookies to bring home for Mike.  We also discovered that 5-6 pm is the perfect time to visit the store.  There was hardly anyone there and we could shop easily without being in anyone's way or worrying about long lines.

2BC74B4C-D721-49CD-813B-BB7E021CB5E6.JPG
6CE4AC3A-87E0-4521-96C0-5FCA2D505EAE.JPG

After a day of adventures, we were treated to some Tex Mex at La Fiesta, by Ashley's sister.  We all loved the chips and salsa.  It was a really cute place and the perfect way to end our whirlwind day in Waco.  I had a wonderful time and I am always up for a new adventure with friends.  Thanks ladies for inviting me to a day full of fun! 

E2AF763C-FC82-4AAB-8506-75744AA1CD77.JPG

Pin a Day: Spicy Cilantro Peanut Slaw

It's good to incorporate vegetables in your diet and trying a variety is the best way to do that.  I have discovered in the past few years that I really like slaws, therefore, I like some cabbage.  So, I was excited to try this recipe for Spicy Cilantro Peanut Slaw.   Unfortunately, I either forgot some ingredients or didn't pay careful attention when I made my shopping list.  From this particular recipe, I forgot the cilantro and the rice wine vinegar.  I decided to try and make do with what I had on stock.  I started by thinly slicing half a head of cabbage.  Next, I chopped up 5 green onions and 3/4 cup of peanuts.  I put them all in a large glass bowl.  I mixed together the dressing of canola oil, vinegar (I substituted white vinegar), soy sauce, honey, sriracha, and sesame oil.  I wisked them together in a measuring cup and poured a little bit at a time on the slaw, working to coat it, but not drown it in dressing.  I did not used all the dressing, but I did use most of it.  I put it in the fridge for a little bit while we finished making dinner and served it with burgers and baked beans.  We really liked this slaw. It was fresh, crispy and we loved the kick of spice that the sriracha added.  I will definitely make this again and hopefully next time I will remember the cilantro! 

FullSizeRender.jpg

Pin a Day: Grits with Cheddar and Bacon

Cooking often bring back memories for me and sometimes certain dishes are really memorable.  For my family, grits casserole was a staple at many gatherings and makes me think of my childhood.    Several years ago, Kraft quit making the secret ingredient and grits casserole has never quite tasted the same.  Living in Texas, I've found several places that serve grits with a Tex-Mex twist or with the addition of bacon.  These were good, but still not quite perfect.  On Sunday, I tried this recipe for Grits with Cheddar and Bacon.  They were so good and made me think of those family gatherings all over again.  I started by melting butter and then adding the garlic and cooking it.  Next, I added water and milk to the pot and let it boil.  I added the grits (I could only find the quick cooking grits.) and let them cook for 5-7 minutes.  I removed them from the heat and added bacon, green onions, cheddar cheese, parmesan cheese, and sriracha.  They were amazing!  We both ate two servings and have been enjoying the leftovers.  I think I can stop searching for the perfect grits recipe because I've found it!

IMG_0240.JPG

Pin a Day: Roasted Potatoes

A bag of potatoes can last a long time in our house.  We just don't eat that many.  I made a really good potato salad a while back and I still had about 1/2 a bag of leftover potatoes.  I saw this recipe for Roasted Potato Salad.   I thought about it and decided to make some modifications to make roasted potatoes.  I already knew I was making baked chicken and thought roasted potatoes would be a great side dish.  I started by washing my small, red potatoes.  I cut each potato in 8 pieces and placed them on a foil lined baking sheet.  I sprinkled them with salt and pepper.  I put them in the fridge for a bit while we went on our evening walk.  Next, I added some roasted garlic and red onions.  I drizzled olive oil over the potatoes and popped it into the oven with the chicken at 425 for about 40 minutes.

A26F6EDA-A74F-4DE3-BB8E-FEB779FF185A.JPG

The results were crispy, flavorful potatoes.  We really enjoyed them.  They were seasoned to perfection and well cooked, too.  This will definitely be something I repeat again in the future and at some point, I might follow the entire recipe and make the dressing, too. 

48DE3013-9318-41EA-808E-0B2904C3212B.JPG

Pin a Day: Molten Chocolate Cupcakes

I love to make sweet treats for my sweetheart each year on Valentine's Day.  I have some heart shaped pans, so many years, I make a heart cake or even a heart cookie cake.  This year, I just wasn't feeling the heart shaped pan, so I opted for cupcakes.  I also knew that its way easier to share leftover cupcakes than cake.  I tried this recipe for Molten Chocolate Cupcakes.   These cupcakes were fairly easy to make, tasted amazing, and were loved by everyone who shared them!  We ended up sharing some with Mike's coworkers and we also took some to share with our friends at Whitestone, leaving plenty for us to enjoy!  I started by making the molten part of the cupcake, which was basically a chocolate ganache.  I heated up the heavy whipping cream and then stirred in my semi sweet chocolate chips.  I put it in the fridge for an hour, taking it out to stir occasionally.  Next, I made my cupcake batter.  It was pretty standard with a cake mix, water, eggs, oil, and pudding.  The biggest difference was the pudding and an extra egg to keep it moist.  I put my batter in my muffin liners using a portion scoop.  Next, I added a small scoop of the molten mix to each cupcake.  I cooked them about 20 minutes.  I noticed a burning smell and realized that the molten mix had erupted out of some of the cupcakes, as they were pretty full.  (This reminds me, I really need to clean the oven!)  The recipe recommended serving the cupcakes warm, but this really didn't work out for us.  I made them early because I needed to be out of the kitchen so Mike could make his signature Valentine's dish, chicken parm.

CEE2A2D6-CD04-4AD0-8F9C-727CC910A523.JPG

After letting the cupcakes cool, I frosted them with chocolate frosting and topped each with a strawberry half before serving.  They were delicious and rich with the added ganache in the center.  This is a great recipe and was a perfect way to add a little bit of pizzazz to a traditional chocolate cupcake. 

0C11DE0A-32E7-46B7-9C09-AEC0E29EE2BF.JPG
IMG_0237.JPG

Pin a Day: Broccoli Chicken Salad

We've been trying to eat a little bit healthier this year, especially during the weekdays.  I've been using Pinterest as a resource to help make that happen.  On Monday, I tried a new recipe for Broccoli Chicken Salad.   This recipe was just okay to me.  I feel like I either had too much broccoli or not enough dressing.  I started by cooking my chicken breast and then shredding it.  While I was waiting for it to cool a bit, I got. The rest of the ingredients ready.  In my large glass bowl, I added 3 cups broccoli florets, 1/4 cup diced red onion, 1/3 cup craisins, 8 slices of chopped bacon, and my cooled, shredded chicken.  Next, I mixed the dressing of mayonnaise, vinegar, and sugar.  I poured the dressing on and mixed it. The ingredients were all things I like, but I just felt like it was a little dry.  Maybe, it needed time to soak up the dressing or maybe I should do 1.5 recipe next time.  I would give this recipe another try, but definitely with some modifications.

C285441E-0673-4860-9C2B-CA743AACB0C3.JPG

Best Franks in the West

We are big fans of "Lazy Sunday."   Given the opportunity, we will relax most of the day.  This Sunday, I was lucky enough to have my aunt and uncle in town, so I got to show them some of the true weirdness of Austin on South Congress.  We also checked off some Austin food boxes with lunch at Hopdoddy's and Amy's Ice Cream for dessert.  It is always nice to have visitors and especially fun to introduce first time visitors to our city.  Mike was coming down with a bit of a cold/allergies, so he had a lazy day with Lola.  That evening we opted to head to Whitestone for a new food truck, Wild West Franks.  The weather was nice so we took Lola and sat on the patio, having a few brews with our franks. 

596BBEF0-D728-4680-8B0D-E0829BF90D2C.JPG

Mike likes hotdogs, so he ordered two different hotdogs that came fully loaded with cheese, onions, hot sauce and relish.  I am not a huge hotdog fan-I like them at a baseball game or I'll eat a turkey dog with my chili.  I lucked out and they were also serving jalapeño sausage, so I ordered a very plain sausage.  It was really good.  It was the right level of spicy and grilled to perfection.  It's nice to have a brew pub so close with rotating food trucks to make Lazy Sunday a little bit lazier.

2D129445-CC93-475B-A034-DE9B0B30D8EE.JPG

Pin a Day: Sweet Pork Quesadillas

It's always good to have some great crockpot recipes for days when you're busy or just don't feel like cooking.  I especially love them on Fridays, when I'm often tired of cooking full meals.  Last week, we tried a new recipe for Sweet Pork Quesadillas.   I love the simplicity of crockpot meals and this one still gave me a chance to put my own spin on it.  To start, I placed my pork roast and a little bit of water in the crockpot and turned it on high for 3 hours.  When 3 hours was up, I drained the water and cut the pork roast in thirds.  Next, I mixed together salsa, Dr. Pepper, and brown sugar.   I poured that on the pork roast and cooked it on low for about 3 hours.  Once the pork was done,  I pulled out the pieces and shredded it using my beast claws.  I put the shredded pork back in the crockpot on warm while I got the next steps ready...

7E5790ED-85B7-4BE4-87D4-E32662BC4BC2.JPG

This is where I put the Jen spin on things.  I decided I didn't want to make quesadillas, so we did sweet pork tacos instead.  We got so yummy small tortillas at HEB that worked better for tacos, anyways.  We topped our tacos with lettuce, cheese, sour cream and guacamole.  They were delicious.  This pork in the crockpot gave us a great canvas for making many different things.  The pork would be great as sandwiches, nachos, and quesadillas, too.  This recipe is definitely a keeper and we will likely try the pork in many different ways. 

FullSizeRender.jpg

Pin a Day: Tomato Basil Chicken

I am always looking for new healthy recipes for two.  So many of the recipes I make provide us with many leftovers.  Sometimes its nice to have smaller meals.  Last week I made this Tomato Basil Chicken.   I was happy to try a new recipe that was healthy, easy, and smaller.  We had just gone on our nightly walk and then I started on dinner.  I started a pot of water boiling for a side of pasta and got a salad put together.  I seasoned two chicken breasts with salt and pepper and got the vegetable oil to heat up in the pan.  I added in the chicken breasts and cooked it about 5 minutes on each side to start. I cooked until the chicken breast was done, but not overdone.  Next, I added in the halved cherry tomatoes and fresh basil.  Finally, I added in cold butter, minced garlic, and more salt and pepper to make the sauce.  I allowed it to cook until the butter was completely melted.

IMG_0234.JPG

I put each chicken breast on a bed of pasta, covered with the sauce, and garnished with Parmesan cheese.  Add in a side salad and a bit of wine and you have the perfect meal for two.  Other than the butter, this was a really healthy meal and you could probably reduce the amount of butter in the recipe.  We really like the fresh flavors and the well seasoned chicken.  This was definitely the perfect meal for two! 

IMG_0235.JPG

Pin a Day: Triple Vanilla Blondies

Trivia and baking seem to go hand in hand lately.  As the crowd for trivia has been growing, I have a new audience to share my treats.  Little did I know that this past week, there would be 12 teams!  I definitely did not have enough treats to share, so I tried to share with the other regulars, the quiz master, and our favorite beer tenders.  We also had luck and came in 1st place this week, so maybe the treats were just what we needed!  This week, I tried Triple Vanilla Blondies.  I knew that the blondies would be easy to transport to trivia and I hoped they wouldn't be too messy.  

FullSizeRender.jpg

I started by preparing the pan and preheating the oven.    Next, I melted the white chocolate chips and butter on the stovetop, being careful not to scorch them.  Once melted, I removed them from the heat and allowed the mixture to cool.  When the mixture had cooled, I stirred in flour, sugar, vanilla, and eggs until well blended.   I spread the mixture in my prepared pan and cooked for 25 minutes.  I let the blondies cool for a bit and then started on the glaze.  I mixed together powdered sugar, vanilla, butter, almond extract and milk.  I spread the glaze on the blondies and the popped them in the fridge to allow the glaze to set.  Before we left for trivia, I cut the blondies and sampled one.  They were delicious.  There was no doubt about all the great vanilla flavor.  They were a big hit at trivia too-I definitely ran out of blondies before I made it to all the teams.  This was a great treat to share with a crowd and an excellent option if you have some non-chocolate lovers in your life.

Pin a Day: Chunky Monkey Bundt Cake

Tuesday Baking Day was a success yesterday.  I decided to try out a healthier recipe, using mostly items I already had at home.  This week's sweet treat was Chunky Monkey Bundt Cake.   I often have ripe bananas stored in my freezer, so I can make banana bread, muffins, or now bundt cake whenever the mood strikes.  I simply take the brown bananas that don't get eaten and pop them in a ziploc bag, which I place in the freezer.  Right before I need them, I pull them out to let them thaw a little.  I squeeze them right out of the skin and it works perfectly.  I started by preheating the oven, prepping my Bundt pan, and gathering my ingredients.  I mixed together the cake mix, water, eggs, and applesauce.  Next, I mixed in the chocolate chips (mini sized) and bananas.  I poured it evenly in the bundt pan and cooked it for about 45 minutes.  I let it cool in the pan on a cooling rack for about 10 minutes and then inverted it on the cooling rack.  It immediately released from the pan.  However, I can tell where I may have missed with the spray as a bit stuck to the pan.  I let it cool completely before storing in my cake container.  We had a little bit last night as a snack and it was yummy!  I did notice that the chocolate chips and bananas obviously sunk during the baking process, so they were concentrated in part of the cake.  The cake was very moist and tender, and we will have to eat it pretty quickly so that it doesn't get moldy too fast.  This cake had great flavor and it was fairly healthy with not much added sugars or extra fats.  You can't go wrong with the banana/chocolate chip combination and this recipe was a great example.  It's perfect if you want a healthy treat, dessert, or even a sweeter breakfast item!

IMG_0226.JPG

Pin a Day: One Pot Chicken Pasta

We had a quiet weekend at home, helping Lola get used to weekend life at our place.  She's still not sure she loves her crate, so we are trying to let her get used to it for short amounts of time.  We didn't hit any new restaurants this weekend, but last night we tried a new recipe.  I loved the idea of this One Pot Chicken Pasta.   I like any meal that is light on dishes and it was really healthy, so we decided to give it a try.  After our evening walk, I had my sous chef get started chopping an onion, red pepper, and zucchini.  Meanwhile, I gathered all the ingredients and got started on the chicken.  I put a little bit of olive oil in my large French oven pot and heated it up.  Next, I added in some minced garlic and my cut up chicken (uncooked).  I cooked it about 4-5 minutes.  It wasn't fully cooked, but I knew it would continue to cook in the pot, so I wasn't worried.  I added in my chopped vegetables, 2 large cans of diced, undrained tomatoes, tomato paste, spices, 3 cups of water, and a box of rotini. I allowed that to come to a boil, which took a bit of time because I had a very large, full pot.  Once it began to boil, I turned down the heat and let it simmer for about 12 minutes.  I checked to make sure the pasta was tender and that most of the liquid had cooked down.  I removed it from the heat and let it set about 5 minutes for the sauce to thicken a bit.  We added some freshly grated Parmesan cheese and we were ready to eat.  It was fabulous!  We loved the flavor and the fact that it was so healthy.  It also made plenty of leftovers, so I know what I'll be having for lunch this week!  This was a very basic recipe, so we thought about some variations we might try, such as sausage instead of chicken and maybe more vegetables.  The possibilities are endless and the results are sure to be delicious!

9B188282-9219-4C93-A212-BC3EFC95AF2D.JPG

Tacos and More

Wednesdays are trivia night at Whitestone and its also usually the day Mike heads to the office.  For dinner, I usually plan a crockpot meal, leftovers, or we see if there's at food truck at Whitestone.  Wednesday was also the first time we left Lola home alone, so it was a big night for everyone.  I saw that Tacon Maye was the featured food truck that evening and Trish, one of our favorite beer tenders, told us how great the food was, so we decided to give it a try.  Our friends, Jake and Ben, recommended the buffalo chicken quesadilla, and I was excited to check it out. 

4D261616-3C2C-448F-958E-72449E40FFCB.JPG

There were several taco and quesadilla options, along with options for chips and homemade salsa.  I ordered the buffalo chicken quesadilla.  Mike selected the Quesadilla Al Pastor and we ordered chips and salsa to share.  We waited a few minutes for them to make our food and we were ready to enjoy.  

Buffalo Chicken Quesadilla

Buffalo Chicken Quesadilla

The food was amazing! My buffalo chicken quesadilla had great flavor and the crunchy addition of tortilla chips was great.  Mike's Quesadilla was great too.  The sauces and salsas all had wonderful seasonings and a bit of a kick to it.  The food was excellent, the people were nice, and the price was great, too!  We loved the food and look forward to trying more items next time they are at Whitestone. 

Quesadilla Al Pastor

Quesadilla Al Pastor

Pin a Day: Salted Caramel Bark

When I have a chance, I like to make treats for Wednesday trivia nights.  I had some free time yesterday so I made some Salted Caramel Bark.   The recipe was pretty simple and the results were fabulous.  My biggest concern was making sure my new sous chef (Lola) didn't get any of the chocolate dripped on her, as she likes to lay in the kitchen and watch what I'm doing.  I gathered my ingredients to get started.  I prepared my pan. The directions didn't specify what size baking sheet to line, but I thought 9x13 would be best.  Unfortunately, I didn't have a 9x13 baking sheet, so I just used my trusty 9x13 pan.  I wiped it with a wet paper towel and the wax paper stuck perfectly.  My next step was to unwrap the caramels.  I put the caramels in a glass bowl with 2 tbsp water and heated in the microwave for 2 minutes.  I have a high powered microwave, so this was all the heat it needed.  I stirred it after microwaving and all the caramel had melted.  Next, I got to work on melting the chocolate.  I don't have an actual double boiler, so I created a make shift one with 2 sauce pans.  I added water to the larger saucepan and turned on the heat to get it simmering.  I added the dark and milk chocolate chips to the smaller saucepan and held it over the simmering saucepan, so the water didn't touch the smaller saucepan.  I stirred the chocolate chips until they were fully melted and glossy.  Immediately after melting the chocolate, I added it to the prepared pan.  Next, I added in the caramel and using a spatula to swirl it in.  I sprinkled it with coarse seat salt and put it in the freezer.  I checked it after 15 minutes, but it wasn't quite firm enough.  I let it sit for another 15 minutes and it was ready to go.  I pulled the waxed paper out of the 9x13 and holding it over the pan, I used my mallet to break the bark into pieces.  The parts that had lots of caramel required me to pull them apart a bit by hand.  I created two containers of bark and put them back into the fridge until it was time to leave for trivia.

9F68DDDF-5D3D-4641-ADD8-C07071F5FB8B.JPG

I gave a small container to the owner and bartenders and kept the bigger container to share with the rest of the trivia crowd.  It was a hit.  It was sticky, but everyone seemed to enjoy the combination of sweet and salty.  It was definitely not the prettiest dessert I've ever made, but it was certainly tasty! 

IMG_0220.JPG

Pin a Day: Easy Pad Thai

When you have a new puppy, routine becomes important.  We've gotten into a pretty good afternoon/evening routine, with a nice walk and home cooked meal before play time and tv time.  We are also lucky Mike has been working East Coast hours so we have an extra hour in the afternoon together.  Last night, I tried a new recipe for Easy Pad Thai.  I love pad Thai, but its a bit of a pain to make, so I had high hopes for this recipe.  It turned out great, but I don't think it was necessarily easy.  I started by making a sauce of tamarind paste, water, fish sauce, brown sugar, black pepper, and chili sauce.  Next, I put the noodles in a pot of hot water and let them soak for about 25 minutes.  Meanwhile, I sliced my chicken into thin pieces and coated it with a mixture of soy sauce and corn starch.  I heated up some vegetable oil in the skillet and added some garlic and red pepper flakes, which I cooked until fragrant.  Then, I added in the chicken and cooked it until it was no longer pink.  Once the chicken was cooked through, I added it my noodles and sauce.  I got the sauce boiling and let the pad Thai cook for another few minutes.  

IMG_0219.JPG

I cut up a few scallions and cilantro, chopped some peanuts, and quartered a lime to be used for garnish.  I also added some shredded carrots and a little spicy mustard.  The results were excellent.  Mike said it was my best attempt at pad Thai yet, which I took as quite a compliment.  Even though it was a pain to make, it was easier than some recipes for pad Thai.  It also makes a ton, which makes it worth the work in my book.  I may prefer restaurant pad Thai for its ease, but this was a great recipe, given that you have the time to devote to making it right. 

F65B5097-16CB-4B7A-BE66-26CC4F3EDB88.JPG

Pin a Day: Loaded Baked Potato Salad

Yesterday was mainly a Lola and Mom day while Mike was working.  I had a little shadow that followed me around all day whether I was reading, riding my exercise bike, or cooking.  She was a really good girl while I cooked, content to lay on the cushioned mat/rug in front of the sink.  I often make new main dishes, desserts, or appetizers, but I don't always try out new side dishes.  I decided to change that by trying out this new recipe for Loaded Baked Potato Salad.   I'm pretty picky about potato salad.  I really like it, but I don't always like some of the ingredients that are included in potato salad.  When I saw this recipe, I knew I had hit the jackpot.  Who doesn't love a delicious loaded baked potato?  I started by washing 1 1/2 lbs of small red potatoes, which was about 1/2 the bag.  Next, I peeled half of the potatoes and cut them into bite sized pieces.  I put them in a medium sized pot, covered them with water, and started them on to boil.  Once they boiled, I let them simmer for about 10 minutes.  I pulled them off the stove and drained them.  I lined a small baking sheet with wax paper and spread my potatoes on it.  Next, I sprinkled on some ranch dressing mix and tossed the potatoes to coat them.  I put the baking sheet in the fridge for 30 minutes to let the potatoes cool.  I cooked some bacon and made the dressing for the potato salad.  The dressing was sour cream, mayonnaise, Dijon mustard, pepper, and garlic.  (I used a roasted garlic that I just got from Penzey's.  It was fabulous!). I added the potatoes to the dressing and stirred until coated.  Next, I folded in shredded cheddar cheese and crumbled bacon.  I put some cut up scallions on top and put it back in the fridge until dinner.

IMG_0217.JPG

After a good walk and making some delightful party sandwiches, dinner was served.  We loved the potato salad.  The dressing was zesty and creamy.  The baked potato toppings made for a yummy treat.  This is one of the best potato salads I've ever had and possibly one of the first I've ever made.  This would be a great treat to have with BBQ or your favorite main course.  I will be adding it to our favorite side dish options.


FullSizeRender.jpg

Neighborhood Pasta Place

This has been an exciting weekend for our family.  On Friday, we found our new furry family member, Lola, but we got there a bit late in the day so we had to wait until Saturday to bring her home.  That was fine because we needed to get a few things for our new girl.  We opted to celebrate by heading to a new restaurant in Cedar Park, Damiano's.  It's located right by Redhorn Brewery and Coffee and the parking lot was quite full at 630 on a Friday evening.  We were able to get seated pretty quickly and we were excited to see that this was authentic Italian food made by authentic Italians!  We took a few minutes to browse the menu before making our choices.  We started with Mozzerella Cheese Sticks.  They were nice and warm and the cheese was delicious.  The marinara sauce was chunky and well seasoned.  The breading reminded us a little bit of a South County favorite, Garvey's. 

0618B4AC-4A0B-48AD-9D3A-E169AD4B1379.JPG

Next, they brought us some bread.  The rolls looked a little bit like bagels, but had the consistency of a yeast roll.  They were lightly brushed with butter, parmesan cheese, and Italian seasoning.  They also tasted great dipped in the marinara sauce. 

9AA827DC-88B4-47FA-92FA-2E5206F511E4.JPG

Finally, our food arrived.  I selected the baked ravioli with Italian sausage.  It was different than any ravioli I've ever had because the meat was not in the pasta, but served on top.  The Italian sausage had a little kick to it, but tasted great and was plentiful for my dish.  There was a layer of melted cheese on top of marinara sauce which covered the ravioli.  There were only about 3 cheese ravioli, but they were giant sized.  I was very happy with my choice.   

3BA0E7F6-D250-4786-A3BD-B08B4A714235.JPG

Mike ordered the Stromboli.  It was huge and stuffed full of meats and cheese.  Several men around us ordered them too, and they all joked that they probably could have split one. Mike was able to conquer about 1/2 of it, which still gave him plenty for leftovers.  Overall, this was a great choice and we must have arrived at the perfect time because as we left, there was a line practically out the door waiting to be seated.  We have finally found some excellent Italian food in Texas, we just had to wait for some Italians to move here!  We will definitely head back, as the entire menu looked delicious and we could probably swing by Redhorn, too.

CD9C4E70-C4DF-4BBE-9889-4F6D6B91890C.JPG

Pin a Day: Slow Cooker Chicken Chili

Apparently its National Soup Month, which seems appropriate for colder weather and weight loss goals.  I love a good soup and usually when you make it in the crockpot, there's plenty of leftovers!  On Thursday, I tried out this recipe for Slow Cooker Chicken Chili.   I love chili and chicken so I definitely had high hopes for this recipe.  My chicken wasn't fully defrosted, so I just cooked everything at high heat for a little bit longer than recommended and it was fine.  I started by putting my chicken in the crockpot. Next, I added the corn, Rotel tomatoes, black beans, pinto beans, and chopped onions.  I cut up a red pepper, a green pepper, and a jalapeño.  I added those to the crockpot.  In another bowl, I mixed together chicken broth, salsa (I used a little less because I couldn't open the new jar), lime juice, garlic, chili powder, and cumin.  I added this mixture to my crockpot and gave it a quick stir.  I barely fit everything in my standard crockpot and probably could have used a larger crockpot, but I was too lazy to search for the big crockpot.  I put it on high and set my timer for 6 hours.

F776F691-34D3-4684-A5DA-5BF4EBA0382F.JPG

About 5.5 hours later, I pulled the chicken breasts out of the crockpot and shredded them with my fabulous bear claws.  (These are one of my favorite kitchen gadgets ever!)  I put the shredded chicken and can of refried black beans back into the crockpot and let it cook for another 25-30 minutes on low.  We topped our chili with shredded cheddar cheese, sour cream, and tortilla chips, all standards in our house.  The results were great!  I loved all the vegetables that were in the chili and I always look for a new way to cook chicken.  The refried beans sounded like a crazy additon, but they were excellent for thickening things up a bit.  It wasn't quite as spicy as my regular chili, but I had followed the directions and measured the spices.  Next time, I would probably just eyeball it and maybe use a spicier chili powder.  Overall, this was a great recipe and definitely made plenty of leftovers.  We will probably have plenty for lunch for a few days and I may try to freeze some, too. 

7C89E5E5-8C62-45F5-93B6-659A47650CE8.JPG

Pin a Day: Torchy's Street Corn

On Tuesday, I finally made a dish that I've been meaning to make for a long time.  The stars all aligned and I was able to make Torchy's Street Corn.  For my non Texan friends and family, Torchy's is a chain started in Austin that makes some of the best and most unique tacos around.  They also have clever names like Trailer Park, Democrat, Republican, etc.  We also stumbled across the fact that they have a delicious side dish called street corn.  It has the vibe of creamed corn with a little bit of a kick to it.  I always wondered what I was eating and finally got a chance to figure it out.  I started by cleaning 4 ears of corn and then grilling them on my grill pan.  It was fun to hear the corn sizzle and pop as I browned it on each side.  I cooked it about 2-3 minutes at a time before switching sides and did each side a few times to get it to brown.  I set the corn aside to cool a little bit and searched for my handy dandy corn stripper.    I used the corn stripper to shave the corn from the cob and added it to a bowl with queso fresco.  I added in some mayo and smoked paprika and mixed it up.  I finished making my tacos and anticipated trying the corn.

IMG_0212.JPG

The results were great!  It had a creamy, smoky vibe to it.  It was a great copycat recipe of the Torchy's street corn.  The only thing that would make it complete would be a copycat of the Trailer Park, trashy style, of course.  

IMG_0213.JPG